
How to Get ‘This PC’ Icon On Desktop in Windows 11?
With the introduction of Windows 11, many users have noticed that the traditional ‘This PC’ icon is not displayed on the desktop by default. For those who prefer quick access to their files and drives, knowing how to get the ‘This PC’ icon on a Windows 11 desktop can be incredibly useful. This guide will walk you through the steps to add ‘This PC’ to your desktop in Windows 11, ensuring that you can easily access all your important folders and drives right from your desktop.
In this article, we look at different ways, to help users smoothly modify their desktops and bring back this vital part of their Windows 11 time.
Method 1: Get 'This PC' Icon Via Setting
If you want to add the 'This PC' icon to your desktop in Windows 11, you can easily do so through Settings. Here's how:
Step 1: Press the Start button, select Settings from there, or press the shortcut keys Win + I to open settings.
Step 2: In the Settings, Click On "Personalization."
Step 3: Click on the "Themes" tab on the Right sidebar.
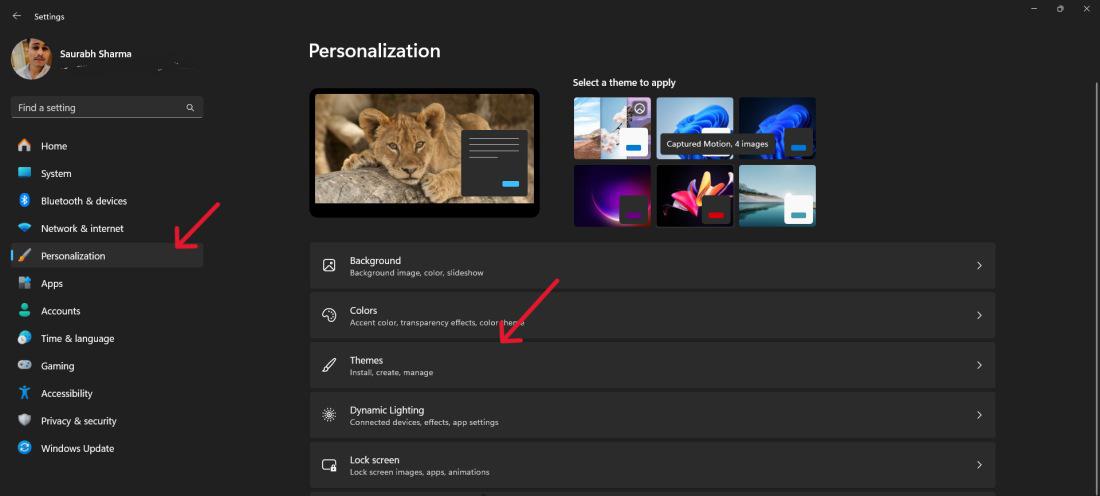
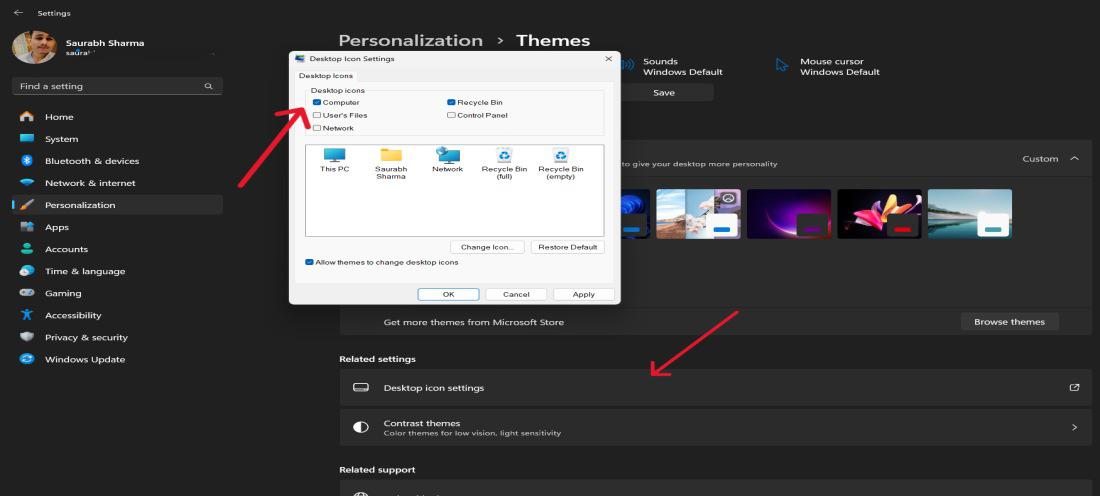
Step 4: Scroll down and click on "Desktop icon settings."
Step 5: Go to the desktop icon settings dialog and tick on “computer” or “this PC” and finally apply and OK.
Method 2: Get 'This PC' Icon by Creating Desktop Shortcut
If you prefer having the 'This PC' icon directly on your desktop for easy access, you can do so by creating a desktop shortcut. Here's how:
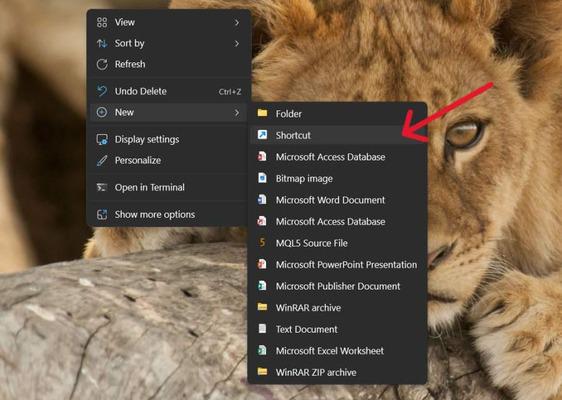
Step 1: Right-click on a space on your desktop.
Step 2: Hover over "New" in the context menu. Choose 'Shortcut'
Step 3: In the "Create Shortcut" window, enter the location of ‘This PC’:
%windir%\explorer.exe shell:MyComputerFolder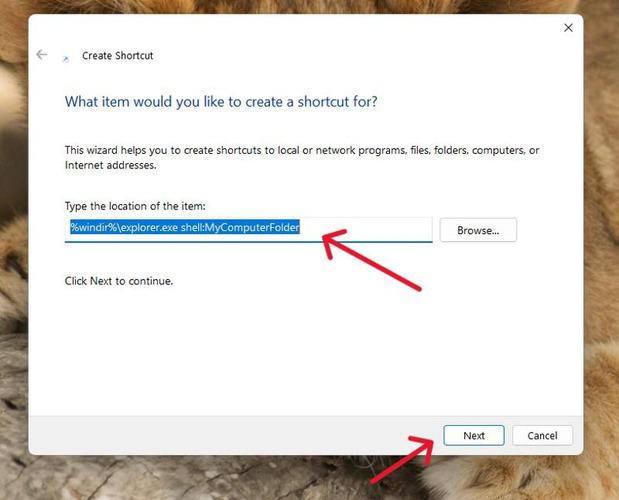
Step 4: Click "Next" and provide a name for the shortcut, such as "This PC."
Step 5: Click "Finish" to create the shortcut.
Method 3: How To Get 'This PC' Icon on Desktop via File Explorer
If you prefer having quick access to your files and drives directly from your desktop, you can easily add the 'This PC' icon using File Explorer. Here's how:
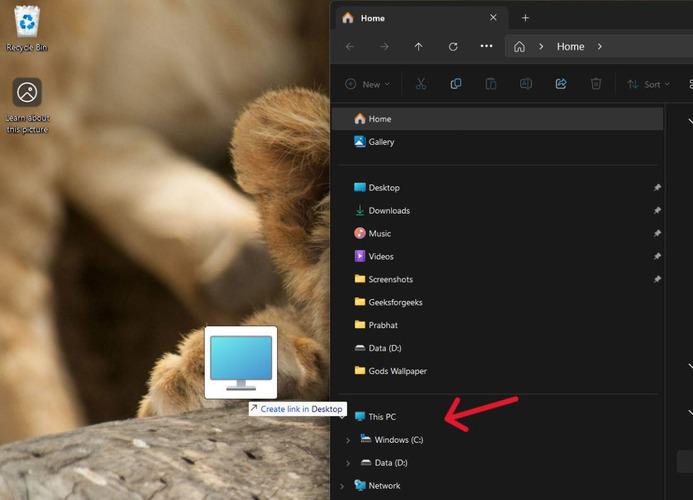
Step 1: Open File Explorer you can use the shortcut Win + E
Step 2: Then, Select 'This PC' from the right sidebar and drag and drop to Desktop
Method 4: How To Show 'This PC' Icon on Desktop via Control Panel
If you prefer using the Control Panel to customize your desktop icons in Windows 11, you can easily show the 'This PC' icon. Here's how:
Step 1: To access the control panel, press Win + X, followed by clicking on Control Panel.
Step 2: Select “Control Panel” then click on “Appearance and Personalization” and click on “File Explorer Options.”
Step 3: Select “open file explorer to this pc” from the menu in the ‘general” tab then click apply.
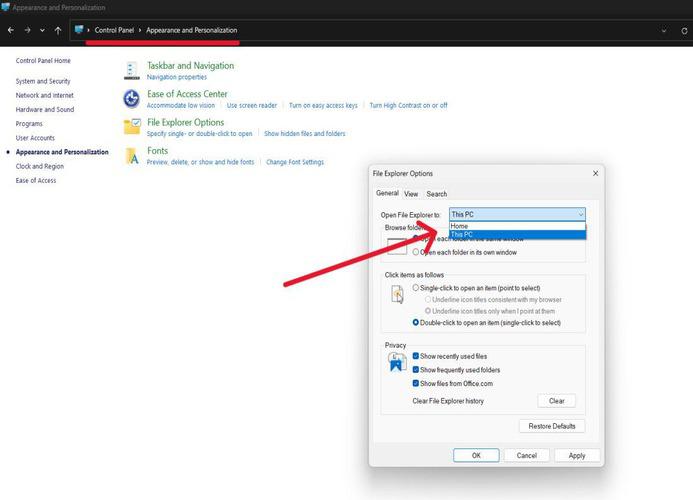
Step 4: Pressing the “Windows + E” will open up the “This PC” window.
Conclusion
Adding the ‘This PC’ icon on a Windows 11 desktop is a simple process that can greatly enhance your user experience by providing quick and easy access to your files and drives. By following the steps outlined in this guide, you can display ‘This PC’ on the desktop in Windows 11 and keep your most frequently used resources at your fingertips. Whether you’re a new Windows 11 user or just looking to customize your desktop, showing the ‘This PC’ icon on your desktop is a great way to start.
How to Get ‘This PC’ Icon On Desktop in Windows 11 - FAQS
On the Windows 11 desktop, where is the ‘this PC’ icon turned On?
If you want to enable the ‘This PC’ icon in your Windows 11 desktop, you can navigate to Settings -> Personalization -> Themes -> Desktop icon settings. Select computer and this pc respectively and click ok when finished.
Is it possible to create a shortcut icon for ‘This PC’ on my Windows 11 desktop?
Right-click on an empty space on your desktop, select "New," then "Shortcut." Enter the location %windir%\explorer.exe shell: To create the shortcut go to This PC name it and complete the process.
How do I quickly open ‘This PC’ in Windows 11 using my keyboard?
To this end, it is possible to create a keyboard shortcut that allows for easy access to ‘This PC’ on one’s windows 11 desktop. Go into this properties box select the short cut key, under the Shortcut tab.
Can I add other icons to the desktop in Windows 11 along with ‘This PC’?
Yes, in addition to adding ‘This PC’ to desktop in Windows 11, you can also add other icons like Recycle Bin, Control Panel, and User’s Files by selecting them in the Desktop icon settings.
Link nội dung: https://tree.edu.vn/index.php/how-to-get-this-pc-icon-on-desktop-in-windows-11-a17679.html